

Quilt binding may sound fancy, but let’s be honest, it’s the final touch that turns your quilt from “almost there” to “ready-to-show-off.” Some quilters love binding because it means the project is nearly done. Others dread it because it’s fiddly and takes patience. One thing’s for sure: mastering binding is an essential skill.
This guide will walk you through everything you need to know about quilt binding – the good, the bad, and the surprisingly satisfying. Whether you’re a pro looking for tips or a beginner wondering where to start, we’ve got you covered. And to make things easier, you’ll find links and hacks from some of the best quilters out there.
Let’s dive in and talk about the process, the techniques, and why binding a quilt is way less scary than it seems.
What Is Quilt Binding Anyway?
At its core, quilt binding is the fabric strip that wraps around the edges of your blanket. It’s the finishing touch that pulls the whole piece together, hiding raw edges and making your quilt look polished and complete. Think of it as the clean edge that frames your masterpiece. Without it, your quilt’s edges would be a frayed mess – not ideal after all that work.
But here’s the thing: binding isn’t just about looks. It adds durability to the quilt, protecting those edges from wear and tear over time. It’s functional and decorative – a win-win for any quilter.
Binding usually comes in a range of styles, like straight-grain binding (great for square quilts) or bias-cut binding (perfect for curves). Choosing the right style depends on your quilt’s design. Don’t overthink it. Once you nail the basics, binding becomes second nature.
Curious about the details? Heather from The Sewing Loft has a picture tutorial that explains binding step-by-step.
How To Create Quilt Binding Strips
Making binding is easier than it sounds. First, measure the perimeter of your quilt – all four sides. Then, add 10–15 centimetres to give yourself wiggle room for connecting the strips and folding corners. That’s how much fabric you’ll need for your binding.
Once you have your fabric, cut it into strips. These strips can be straight-grain (good for easy designs) or bias-cut (perfect for curves). Most quilters opt for strips about 6.5 centimetres wide. This width offers enough room to wrap around the edges of the quilt completely.
The real trick is joining the strips. Sew them together at a diagonal to avoid bulk, then iron the seams flat. Congratulations – you’re one step closer to finishing your quilt!
Sewing Quilt Binding Step By Step
Attaching the binding is where things get exciting or nerve-wracking, depending on your confidence level. Start by pinning your binding strips along one side of the quilt. Use sewing clips if pins feel like too much hassle. Sew along the edge using a 1/4-inch seam allowance. Sounds simple, right? Absolutely, but the corners are where the magic happens.
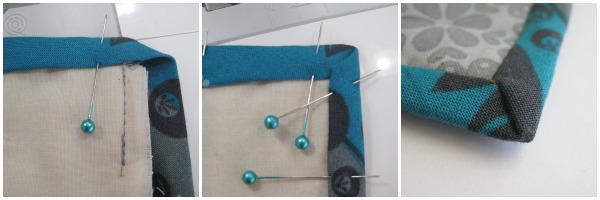
When you approach a corner, fold the binding strip diagonally to keep the edges neat. Then fold it back in line with the next quilt side. This method, called mitering corners, gives your quilt professional-looking, sharp edges. It might feel tricky the first couple of times, but give it a few tries and you’ll be mitering like a pro.
Once all sides are sewn, fold the binding over the quilt’s edge and stitch it down – either by hand for a classic look, or by machine for speed.
Hacks For Perfect Binding
Let’s face it, binding can be time-consuming, but there are ways to make it easier. One great hack is to use double-fold binding. It’s basically a pre-folded strip that ensures no raw edges peek through. Another trick is keeping an iron handy. Pressing as you sew works wonders for keeping everything neat.
Some quilters swear by glue basting instead of pins. A thin line of washable glue keeps your binding in place during sewing – no poking yourself with pins required!
If binding still feels overwhelming, try practising on smaller projects like placemats or mini quilts. These lower-stakes projects are perfect for experimenting before you tackle a full-size quilt.
Remember, quilt binding isn’t about perfection. It’s about learning and enjoying the process. With practice and patience, even tricky corners will start to feel easy.
Why Quilt Binding Is Worth The Effort
Is quilt binding fiddly? Yes. Does it take patience? Absolutely. But here’s the good news: finishing that binding is the moment your quilt transforms from “almost done” to “I made this, and it looks incredible!”
Binding is like tying a bow around a gift. It’s the little detail that makes everything shine. Skipping or rushing this step robs your quilt of its full potential. Instead, embrace it. Take your time, fold those mitered corners, and sew with care.
Once done, your quilt will have that polished, professional look. Plus, you can proudly show off your clean edges to friends, family, and even fellow quilters. If anything’s worth sticking with to the end, it’s quilt binding.
Final Thoughts
Quilt binding may be time-consuming, but it’s a skill that pays off every time you finish a project. It transforms your quilt into a framed work of art – clean, durable, and ready to show off. With simple techniques, creative hacks, and a bit of patience, binding becomes less of a chore and more of a finishing flourish.
So whether you’re folding your corners by hand or speeding through with a machine, don’t skip this essential step. After all your work on the quilt top and quilting, that last stitch deserves to look just as stunning. Master quilt binding and give every masterpiece the final touch it deserves.
How To Make A T-Shirt Quilt
Ready to try a different type of quilting project? T-shirt quilts are a creative way to preserve memories while making something functional and beautiful.
Before diving in, you’ll need to properly prepare your shirts for quilting to ensure a smooth process and professional-looking results. Learn the essential steps, including pressing and stabilizing your T-shirts, in this detailed guide: How to Make a T-Shirt Quilt: Preparing the Shirts. It’s packed with tips to help you transform your favourite old shirts into a nostalgic quilt masterpiece!

This post was originally published on January 30, 2015.


